I Removed a Thunderbolt Device Now I Cant Install It Again
Z7_3054ICK0KGTE30AQO5O3KA30N0
hp-concentra-wrapper-portlet
Actions
HP Aristocracy Dock with Thunderbolt 3 and HP ZBook Dock with Thunderbolt 3 - Using and Troubleshooting the Dock
This document applies to the HP Elite and HP ZBook Thunderbolt 3 Dock.
HP notebooks uniform with the HP Thunderbolt three Dock:
-
ZBook 17 G4
-
ZBook 15 G4
-
ZBook 15 Studio G4
-
Zcreate G1
-
HP EliteBook 1040 G4
-
HP EliteBook X360 1020 G2
-
HP Elite X2 1012 G2
-
HP EliteBook X360 1030 G2
Important: Best practices for docking and undocking
HP recommends that the HP Elite Dock with Thunderbolt 3 or the HP ZBook Dock with Thunderbolt 3 be plugged in to the HP notebook or HP ZBook Mobile Workstation while information technology is fully on or fully off (not in a Standby or Hibernate land). When detected, a Thunderbolt icon appears in the system tray. At this indicate, the HP notebook or HP ZBook Mobile Workstation will outset initializing all the devices connected to the dock, and then at that place might be a slight delay earlier the devices are ready to use.
When removing the HP Elite Dock with Thunderbolt iii or HP ZBook Dock with Thunderbolt iii from your HP notebook or HP ZBook Mobile Workstation, unplug the dock first, wait until the Thunderbolt icon in the system tray is gone, and and then put the notebook or mobile workstation into a Standby, Hibernate, Restart, or Shut-down land.
Connecting and disconnecting the dock
Use the sections beneath for aid connecting and disconnecting the dock from the computer or tablet.
For optimal performance, utilize the dock with a computer running the Windows x, Windows 8, or Windows 7 operating system. Merely computers with Thunderbolt ports are supported. When the dock is connected to the computer, external devices tin can exist connected to the ports on the dock or to the ports on the computer. Your computer and monitor must support USB 3.0 and DisplayPort 1.2 to use all of the dock features. If your devices do not support these technologies, you tin still utilize the USB 2.0 and DisplayPort 1.1 functions.
Figure : HP Elite Dock with Thunderbolt 3
Figure : HP ZBook Dock with Thunderbolt iii
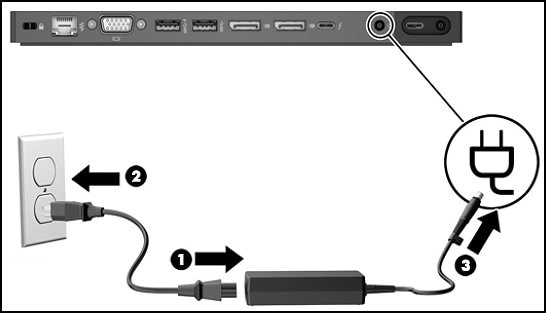
Footstep 1: Connect to Air conditioning power
To ensure the correct performance of all dock features, connect the dock to an Ac power source using the dock power cord.
warning:To reduce the risk of electrical daze or damage to the equipment:
Plug the power cord into an Air-conditioning outlet that is easily accessible at all times.
Disconnect power from the equipment by unplugging the ability string from the AC outlet.
If provided with a 3-pivot attachment plug on the power string, plug the string into a grounded (earthed) 3-pivot outlet. Exercise not disable the power cord grounding pin, for example, past attaching a 2-pivot adapter. The grounding pivot is an important safety feature.
Use the following steps to connect to Air conditioning power.
-
Connect one end of the power cord to the AC adapter, and connect the other cease of the power cord to an AC outlet.
-
Connect the AC adapter to the ability-in connector on the dock.
Connect to Air-conditioning adapter Connect to AC power Connect Air-conditioning adapter to dock
Footstep 2: Update the computer
The following department includes a summary of all Thunderbolt 3 Dock components that can exist updated. When updating multiple components related to the Thunderbolt 3 Dock, update the components in the social club shown beneath, and restart the computer after each component is installed earlier the next component is installed.
note:If your computer was purchased before May 2016, you lot will need to perform the updates described earlier connecting the dock to your computer. If you are unsure when your reckoner was purchased, HP recommends updating your computer.
Go to http://www.hp.com/support. Select Become software and drivers, enter your calculator model number (located on the estimator service label), then select Find my product.
Click the link for your specific reckoner, select your operating organization, and so download the latest BIOS, software, and drivers as follows:
-
Latest BIOS version for your computer
-
Intel Thunderbolt Secure Connect driver
-
Thunderbolt 3 Dock firmware
-
Intel Thunderbolt firmware update utility
-
Intel graphics drivers
-
AMD or NVIDIA graphics driver (depends on your notebook configuration)
-
ASMedia eXtensible host controller commuter
-
Ethernet controller driver
-
Conexant Sound USB driver
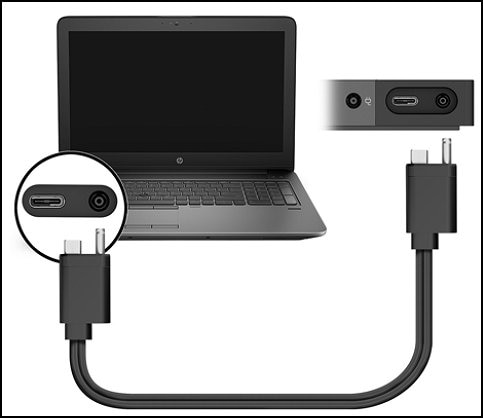
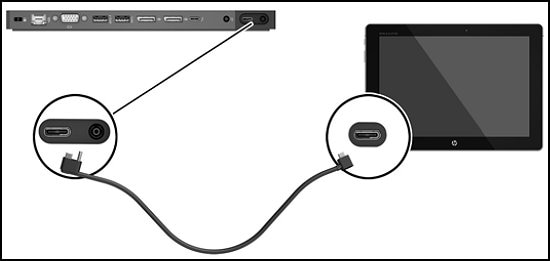
Pace three: Connect to a calculator
To connect a computer to the dock:
-
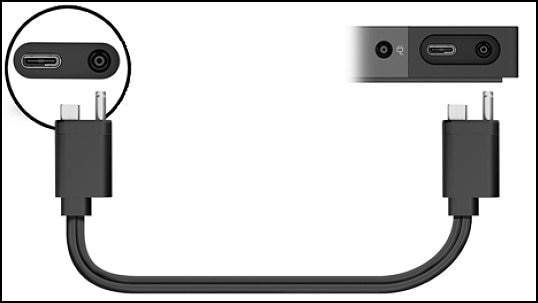
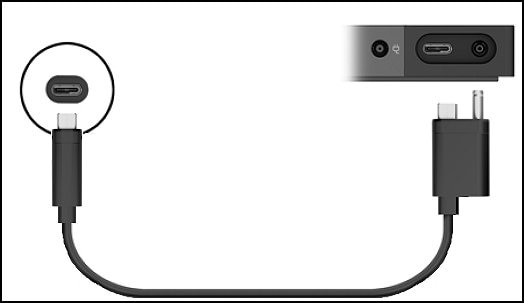
Connect the included cable to the Thunderbolt 3 port and power-out connector on the back of the dock.
-
Connect the other finish of the cable to the Thunderbolt 3 port and power-in connector or USB Blazon-C ability connector and Thunderbolt port on your computer.
annotation:Be sure that your computer is either on or off. HP does not recommend connecting to a computer that is in Sleep or Hibernation mode.
Figure : HP ZBook Dock with Thunderbolt 3 (150 Due west/200 West)
Effigy : HP Aristocracy Dock with Thunderbolt 3 (65 West)
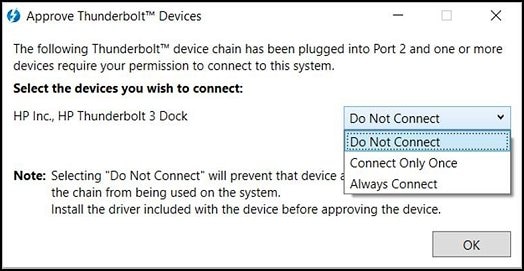
Step 4: Qualify the dock for the beginning time
When connecting the dock to your computer for the first time, you might need to authorize the Thunderbolt device.
note:You must be logged on as an administrator of the local computer. To enable a non-administrator user to select OK, enter the non-administrator registry primal. Contact your HP Technical Consultant for this key.
Use the following steps.
-
In the dialog, click OK to run the application with ambassador privileges.
-
A 2nd dialog opens. Choose how to connect to the devices using the following options.
-
Exercise Not Connect: Prevents the dock from connecting to the computer.
-
Connect Just Once: Allows the dock to connect to the figurer. Each time the dock is connected and disconnected, you must log on every bit an administrator to let access to the dock.
-
Always Connect: Allows the dock to connect to the computer. The dock tin connect to the computer automatically after information technology is disconnected and reconnected, even if you are non logged on as an ambassador.
-
-
Select OK to save the configuration.
While the dock is connected to the computer, a Thunderbolt icon is displayed in the notification area, at the far right of the taskbar.
note:
There might exist a slight delay before devices continued to the dock are ready for use.
Pace 5: Disconnect the dock
To disconnect the dock from the estimator, follow these steps:
note:When removing the dock from your estimator or tablet, HP recommends to disconnect the dock first, wait until the Thunderbolt icon in the system tray is gone, and then put the notebook or tablet into a Standby, Hide, Restart, or Close-downwardly state.
-
Click the Safely Remove Hardware icon in the notification area, at the far right of the taskbar.
-
Click Safely Remove USB Docking Station. The Safe to Remove Hardware message is displayed.
-
Disconnect the included cable from the computer and and then from the dock.
-
Disconnect the ability cord from the dock.
Connect external devices to the dock
Use the following sections for aid connecting external devices to the ports on the dock.
Connect to a network
You can connect the estimator to a network through the dock. This requires an Ethernet cable (purchased separately).
-
Connect the dock to the estimator.
-
Connect i end of the Ethernet cable to the RJ-45 (network) jack on the dock and connect the other cease to an RJ-45 wall jack or router.
note:If the network cable contains racket suppression circuitry, which prevents interference from TV and radio reception, orient the circuitry end of the cable toward the calculator.
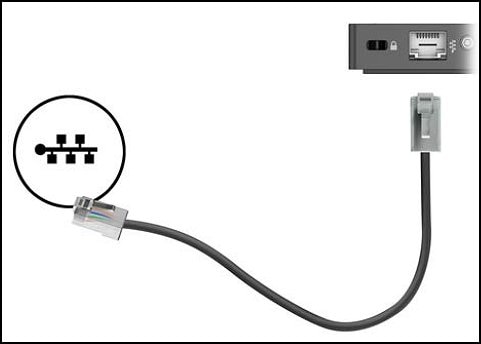
note:The RJ-45 port on the dock does not support Intel vPro Technology. To use Intel vPro Engineering, connect to a wireless network or use an RJ-45 port on your figurer.
Connect USB devices
The dock has four USB ports: two USB 3.0 ports on the forepart panel, i USB 3.0 port on the rear panel, and ane USB 3.0 charging port on the rear panel. Use the USB ports to connect optional external USB devices, such equally a keyboard and mouse.
Connect video devices by using a VGA cable (select products only)
To meet the computer screen image on an external VGA monitor or projected for a presentation, connect a monitor or projector to the dock's VGA port.
note:To connect a VGA video device to your dock, y'all need a VGA cablevision, purchased separately.
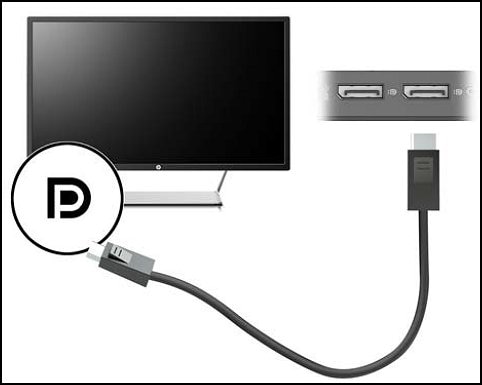
Connect to a DisplayPort device
To connect a DisplayPort video device to your dock, yous need a DisplayPort cablevision, purchased separately.
The dock can also be continued to an external device, such as a monitor or a projector, through the DisplayPort.
The dock DisplayPort supports external monitors upwardly to a 4096 × 2160 resolution. If yous connect a 4096 × 2160 external monitor to each of the dock DisplayPorts, you must reduce the frequency to thirty Hz.
If y'all connect a 4096 × 2160 external monitor to a dock DisplayPort and a 4096 × 2160 external monitor to the dock USB Type-C port using a USB-Type-C-to-DisplayPort adapter, you can leave the frequency at sixty Hz.
The dock supports a 5120 × 2880 monitor when information technology is connected to both DisplayPorts.
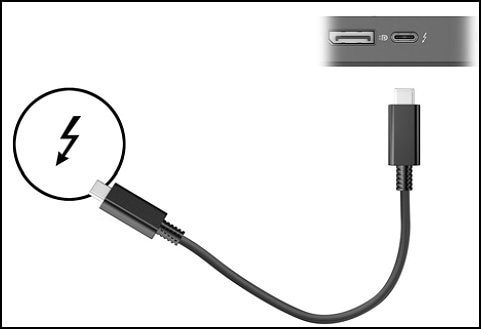
Connect a Thunderbolt 3 device
The Thunderbolt 3 port connects an optional loftier-resolution display device or a high-performance data device. This port delivers higher performance than the VGA external monitor port and improves digital connectivity.
This connector supports only Thunderbolt three devices.
note:Install all the latest drivers for your Thunderbolt 3 device earlier connecting the device to the Thunderbolt three port. The Thunderbolt three cable and Thunderbolt iii device (both sold separately) must exist compatible with Windows. To decide whether your device is Thunderbolt Certified for Windows, go to the Thunderbolt Technology website (in English).
-
Connect one cease of the Thunderbolt 3 cable to the Thunderbolt port on the dock.
-
Connect the other end of the cable to a high-resolution display device or a loftier-operation information device.
Connect audio
Yous can connect headphones or speakers straight to the audio-in (headphone) / audio-out (microphone) combo jack on the dock. You tin as well connect analog audio devices. Headphones combined with a microphone are called headsets. You can connect wired headsets to the audio out (headphone) / audio-in (microphone) combo jack on your dock.
-
Connect one end of an audio Y-cablevision (purchased separately) to the headphone jack on the dock.
-
Connect the other end to the red and white audio-in jacks on your telly or stereo equipment. See your television or stereo equipment user guide for the jack names and locations.
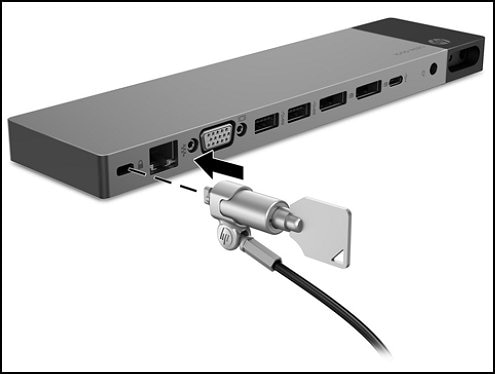
Connect an optional security cablevision
Use the post-obit steps to connect a security cablevision:
-
Loop the security cable around a secured object.
-
Insert the cardinal into the cable lock.
-
Insert the cable lock into the security cablevision slot on the dock, and then turn the cardinal.
-
Remove the key.
Configure an external monitor in Windows
Use Windows to configure the display of a monitor attached to the dock.
note:When you lot starting time connect the dock to a estimator using Windows seven, the Windows backdrop screen appears, and the external display is automatically configured in Mirror mode as the default.
In Windows 10, type control panel in the taskbar search box, then select Command Panel. Select Appearance and Personalization.
You can besides access the display settings by pressing the Windows key + P on the keyboard.
-
To view the screen prototype on the monitor only, select Second screen merely.
-
To view the screen paradigm extended across both the computer and the monitor, select Extend.
-
To view the screen image simultaneously on both the calculator and the monitor, select Indistinguishable.
The following listing shows the display capabilities of various graphics processors.
-
A estimator using Intel HD graphics can support upwards to three monitors, including the computer monitor.
-
A computer using NVIDIA graphics can support up to 4 monitors, including the figurer monitor.
-
A figurer using AMD graphics can support up to six monitors, including the computer monitor.
-
A figurer using hybrid graphics can back up up to six external monitors.
-
Display limitations vary depending on your reckoner. If a monitor is connected to your figurer HDMI or USB Type-C port, the number of monitors you can connect to the dock might exist fewer than three.
Sleep, hibernation, shutdown, and restart
If the calculator initiates Sleep or Hibernation, the monitor turns off. When the computer exits Sleep or Hibernation, the connected monitor returns to the previous monitor settings. If you restart or shut down the figurer and then plow it dorsum on, the continued monitor returns to the previous monitor settings.
HP does not recommend disconnecting the dock from a figurer that is in Sleep or Hibernation mode, so disable these power states using the following procedure.
-
Open Control Panel and select the Ability Options page.
-
Click Choose what endmost the lid does. Click Practise zip, then click OK.
-
Nether Plugged in, select Do nothing, then click Salve changes.
Troubleshooting common issues
The following common issues might be encountered when using the dock.
note:If y'all are having problems with the dock, they might exist acquired by outdated BIOS, drivers, or firmware. Ensure that all the updates are installed earlier continuing with the troubleshooting.
The dock is not recognizing the notebook
If the dock is not recognizing the notebook, ensure your notebook is compatible with the dock. See the listing of compatible notebooks in this document.
Ensure all Thunderbolt 3 Dock components are updated. Encounter Update the computer in this document.
The dock is non charging the notebook
If the dock is not charging the notebook, come across Charging Support in this document.
The power light on the dock is off
The dock is non connected to Ac power. Connect the power cord to the dock and to an Ac outlet.
The dock or peripherals connected to the dock do not appear in Windows
Try the following steps in gild until the trouble is resolved:
-
Unplug and re-plug the dock.
-
Restart your notebook or mobile workstation.
-
Perform a difficult reset. A hard reset temporarily disconnects the internal bombardment to fully reset the computer. Power off the computer and disconnect the AC power cord. Printing and concur the power button on the reckoner for 15 seconds.
A USB device continued to the dock stops functioning
-
Disconnect and reconnect the USB device from the dock.
-
Unplug and re-plug the dock to the computer.
-
Restart your notebook or mobile workstation.
-
Perform a hard reset. A difficult reset temporarily disconnects the internal battery to fully reset the figurer. Ability off the computer and disconnect the AC power cord. Press and hold the ability button on the figurer for fifteen seconds.
A brandish connected to the dock does non function
-
Disconnect and reconnect the display to the dock and check to meet if your display returns properly.
-
If your computer has NVIDIA graphics, open the NVIDIA Command Console and bank check Display/Gear up multiple displays. If you see Digital Display or if one of your monitors is listed twice (when you accept just 1 of a specific model), disconnect and reconnect the display to the dock again.
-
If the NVIDIA Control Console lists all your displays just one is not checked, check that monitor and and so click Apply in the lower right corner.
-
Restart your notebook or mobile workstation.
-
Perform a difficult reset. A hard reset temporarily disconnects the internal battery to fully reset the reckoner. Ability off the computer and disconnect the AC power cord. Printing and hold the power button on the computer for 15 seconds.
Video distortion or abuse appears on the displays
-
Press the Windows primal on your keyboard.
-
To modify DPI scaling to 225% or lower, go to System Settings, and then click Display.
-
Under the section Alter the size of text, apps, and other items, fix the value to 225% or lower.
Brandish changes mode after sleep, hibernate or restart
Press the FN + F4 keys or the Windows fundamental + P keys and select the desired style (Extended, Duplicate, PC Only, or 2d Screen only).
A USB port on the dock is disabled
The USB device fastened to the port might not be compliant with the dock power specifications and is using besides much power. Try the post-obit steps in lodge until the trouble is resolved:
-
Disconnect the device that disabled the port.
-
Disconnect the power cord from the dock, so reconnect information technology.
-
Disconnect the dock from the figurer, then reconnect it.
When the dock is connected to the computer, both the WLAN and the LAN are connected
Switching from the WLAN connection to the LAN connection is not supported. Disable the WLAN connectedness using the post-obit steps:
-
In Windows x, correct-click Start, and then select Network Connections.
-
Right-click Wi-Fi, then click Disable.
Headphones or other audio devices connected to the dock practise not produce audio
An audio device is connected to the headphone jack on the dock, but the dock is not the default audio device. The sound port on the dock connects optional powered stereo speakers, headphones, earbuds, a headset, or a television audio cable. It also connects an optional headset microphone. The port does not support optional standalone microphones.
Try the following steps in order until the problem is resolved:
-
The drivers for the dock might not exist installed. To install the drivers, see Updating the computer.
-
Set the dock as the default audio device in the computer settings, or connect the audio device to the computer.
A microphone connected to the dock does not work
A microphone is connected to the dock, just the dock is not the default audio device. The audio port on the dock connects optional powered stereo speakers, headphones, earbuds, a headset, or a television audio cable. It also connects an optional headset microphone. The port does not back up optional standalone microphones.
Attempt the following steps in club until the problem is resolved:
-
The drivers for the dock might non be installed. To install the drivers, see Updating the computer.
-
Fix the dock every bit the default audio device in the estimator settings, or connect the microphone to the computer.
A video does not display
The drivers for the dock might not be installed. To install the drivers, see Updating the computer.
Fonts and other characters on the external monitor appear large
The external monitor screen resolution is higher than the maximum limit of 2560 10 1600. Set the screen resolution equal to or lower than the maximum limits.
The graphics application does not detect the external monitor
The external monitor cannot exist set as the primary monitor when using some Intel graphics applications
Older Intel graphics applications do non support setting the external monitor as the primary monitor. Go to the Software and Commuter downloads page for your calculator and download the latest Intel chipset and graphics drivers.
A video device connected to the external monitor port displays a blackness screen when playing Blu-ray or other protected content
The dock does not support viewing Blu-ray or other protected content on an external display device connected to the external monitor port on the dock.
Features and specifications
See the post-obit for details about the features and specifications for the dock. More details are available in Help and Support equally well as the user guide.
note:Your computer might non be equipped to take advantage of all the features available on the dock.
Identifying components
Identify the components on the front of the dock.
Power push button Power light (On - Dock is on. Blinking - Dock is in standby mode. USB three.0 ports (ii) Audio-out (headphone) / Audio-in (microphone) combo jack
Place the components on the back of the dock.
Security cable slot RJ-45 (network) jack External monitor port (VGA) USB iii.0 charging (powered) port USB 3.0 port DisplayPorts (2) Thunderbolt three Port Ability-in connector Thunderbolt 3 port and ability-out connector
note:Thunderbolt iii is new technology. Install all the latest drivers for your Thunderbolt three device before connecting the device to the Thunderbolt iii port and power-out connector. The Thunderbolt 3 device (sold separately) must exist compatible with Windows. To decide whether your device is Thunderbolt Certified for Windows, become to the Thunderbolt Technology website (in English language).
Pre-Boot Support
The docking station is not supported in the pre-Bone surround (PXE boot, USB devices in pre-boot, etc.). Peripherals continued to the docking station practise non function outside of the operating system.
vPro Support
vPro functionality is not supported through the docking station Local Expanse Network (LAN). To enable vPro support, either access through a wireless network or past plugging into the LAN on the notebook or mobile workstation where available.
Charging Support
HP ZBook Dock with Thunderbolt three cable
Dual custom ends (Air conditioning+USB Type-C to Air conditioning+USB Type-C)
note:Mobile work station charging is supported but through the AC connector on the HP ZBook Thunderbolt three Dock Cablevision. The USB Type-C connector is used for data transfer. Therefore, when using the HP ZBook Thunderbolt 3 Dock Cable to charge your mobile workstation through the dock, a notification indicating a lack of support for charging through the USB port will appear. This applies only to the USB port, and your system will proceed to charge using the AC connector.
HP Aristocracy Dock with Thunderbolt 3 cable
Single custom end (AC+USB Type-C to USB Type-C)
-
Customized for 1012 G1 Tablet and EliteBook Folio G1
-
Loftier speed information transfer
-
Capable of charging 1012 G1 Tablet and EliteBook Page G1 simply
-
Does NOT charge mobile workstations
Third Political party USB Blazon-C Cable
USB Type-C to USB Blazon-C
Users should utilize ONLY the cables that are shipped with the dock when connecting the dock to the notebook or mobile workstation.
Third party cables are Not supported for connecting the dock to the notebook or mobile workstation.
Brandish Capabilities
Display Configurations | Type-C dock display ports | DP dock display ports | DP dock display ports | VGA dock brandish ports |
(ii) 4k Displays – (A) | 4096x2160 | 4096x2160 | X | X |
(2) 4k Displays – (B) | 4096x2160 | X | 4096x2160 | X |
(one) 4k and (2) ii.5k Displays | 4096x2160 | 2560x1600 | 2560x1600 | X |
(1) 4k, (2) ii.5k Displays, and (1) FHD | 4096x2160 | 2560x1600 | 2560x1600 | 1920x1200 |
(ane) 5k – (A) | 5k DP cord 1 | 5k DP cord 2 | 10 | X |
(1) 5k – (B) | 5k DP cord 1 | 10 | 5k DP cord 2 | X |
(1) 5k and (ane) FHD – (A) | 5k DP cord ane | 5k DP cord 2 | 1920x1200 | Ten |
(1) 5k and (1) FHD – (B) | 5k DP string 1 | 5k DP string ii | X | 1920x1200 |
(one) 5k and (1) FHD – ©) | 5k DP cord one | 1920x1200 | 5k DP cord 2 | X |
(1) 5k and (1) FHD – (D) | 5k DP cord ane | X | 5k DP cord ii | 1920x1200 |
(iv) FHD Displays | 1920x1200 | 1920x1200 | 1920x1200 | 1920x1200 |
Multiple Monitors Support
-
HP ZBook Mobile Workstations using only an Intel HD graphics solution can support up to three displays, including the mobile workstation display.
-
NVIDIA® graphics can support up to four displays, including the mobile workstation display.
-
AMD graphics tin support up to vi displays, including the mobile workstation display.
-
When used together, the HP ZBook Dock with Thunderbolt three and HP ZBook fifteen/17 configured with hybrid graphics, a maximum of 6 independent displays are supported.
When used together, the HP ZBook Dock with Thunderbolt 3 and HP ZBook Studio configured with hybrid graphics, a maximum of v independent displays are supported.
-
Refer to the HP Thunderbolt 3 Dock Brandish Configurations @ threescore Hz table for HP Thunderbolt 3 Dock display connection options.
5K Display
-
Requires ii DP connections.
-
One of the two DP connections must be made through the USB Type-C port. Refer to the previous tabular array for the dock'due south display connexion options.
-
AMD graphics require both connections of the 5K display to be made through USB Blazon-C ports.
One of the connections must be through the notebook or mobile workstation's USB Type-C port.
The second connection can exist to the notebook or mobile workstation'southward 2d USB Type-C port or the USB Type-C port on the dock.
None of the display ports on the dock can be used when a 5K brandish is active on AMD graphics.
4K Display
-
Only one 4K at 60Hz display connection can be made to the brandish ports on the dock.
-
In order to utilise a 2nd 4K at 60Hz display, the connections must be made through the USB Type-C port on the dock or directly to the notebook or mobile workstation. Refer to the Display Capabilities tabular array for the dock'southward display connection options.
HDMI and USB Type-C
-
Displays continued to the HDMI, USB Type-C #1 and USB Blazon-C #2 ports on the notebook or mobile workstation cannot exist agile at the aforementioned time.
-
All four displays connected to the dock may be active only when both HDMI and USB Type-C ports on the notebook or mobile workstation are not in utilize.
-
When a display on HDMI (or USB Blazon-C) on the notebook or mobile workstation is active: either displays on (a) dock's USB Blazon-C or (b) Dock's VGA+DP+DP can be active, but not both sets.
Legacy Thunderbolt Support
The utilize of legacy Thunderbolt devices requires a Thunderbolt 3 to Thunderbolt adapter.
Thunderbolt Security Levels – Available Functions and Ports
The security levels tin be changed in the BIOS setup. To access the BIOS setup, press the F10 central when booting the HP Notebook or HP ZBook Mobile Workstation.
Security level 0: PCIe and Display Port - no security
-
No security level. Whatever Thunderbolt device attached will be accessible without approval.
-
External displays will function when attached directly to the notebook or mobile workstation or the dock through display or USB ports.
Security level 1: PCIe and Display Port - user authorisation
Same functionality as Security level 0, but the customer must approve access to devices.
Security level 2: PCIe and Display Port - secure connect
Aforementioned options as Security level i if the device contains a security certificate/scrap.
Security level 3: Display Port and USB
-
Thunderbolt functionality is disabled; thus, the docking station and all its ports will not function.
-
Only USB and display ports volition function on the notebook or mobile workstation.
Input power
The power information in this section might be helpful if you plan to travel internationally with the dock. The dock operates on DC power, which can be supplied by an AC or a DC power source. The AC power source must be rated at 100–240 V, 50–60 Hz. Although the dock tin exist powered from a standalone DC power source, it should be powered simply with an AC adapter or a DC power source supplied and canonical by HP for use with this dock.
The dock tin operate on DC power within the following specifications.
Input Power | Rating |
Operating voltage and current | xix.7 V DC @ 2.31 A – 65 W xix.vii 5 DC @ 2.31 A – 150 West 19.7 V DC @ 3.33 A – 200 W |
note:This product is designed for Information technology power systems in Kingdom of norway with stage-to-phase voltage not exceeding 240 V rms.
The reckoner operating voltage and electric current can exist establish on the organisation regulatory label.
Operating environs
Cistron | Metric | U.S. |
Operating | 0°C to 35°C | 32°F to 95°F |
Nonoperating | -20°C to lx°C | -iv°F to 140°F |
Factor | Metric | U.S. |
Operating | 10% to ninety% | 10% to 90% |
Nonoperating | 5% to 95% | 5% to 95% |
Cistron | Metric | U.Due south. |
Operating | -fifteen m to 3,048 one thousand | -50 ft to x,000 ft |
Nonoperating | -15 one thousand to 12,192 m | -50 ft to 40,000 ft |
Source: https://support.hp.com/rs-en/document/c05060909
Post a Comment for "I Removed a Thunderbolt Device Now I Cant Install It Again"